How to Delete All Emails from One Sender in Gmail (Step-by-Step)
July 3, 2026 · Written by Raghu Kumar
Your Gmail inbox is buried under thousands of emails from the same senders. The brand you bought from once, years ago, that now sends three emails a week. The weekly newsletter you signed up for while browsing, but never opened. The app you stopped using months ago, still checking in like nothing's changed.
Individually, each one is easy to ignore. Collectively, they add up to thousands of emails - and occupy a meaningful chunk of your Gmail storage.
The good news: Gmail does let you select and delete every email from a specific sender in one go. The not-so-good news: when you have more than one or two bulk-email senders, the process becomes a repetitive chore that's easy to start and easier to quit. This post walks through both the native Gmail method and what to do when that method becomes repetitive and impractical.
The Native Gmail Method: Search, Select, Delete
This works in Gmail on desktop (browser). Mobile Gmail doesn't support bulk operations the same way.
Step 1: Search by sender
In the Gmail search bar, type: from:sender@example.com
Replace sender@example.com with the actual email address you want to bulk delete. Hit Enter. Gmail will return every email in your account from that address - inbox, archive, and all.
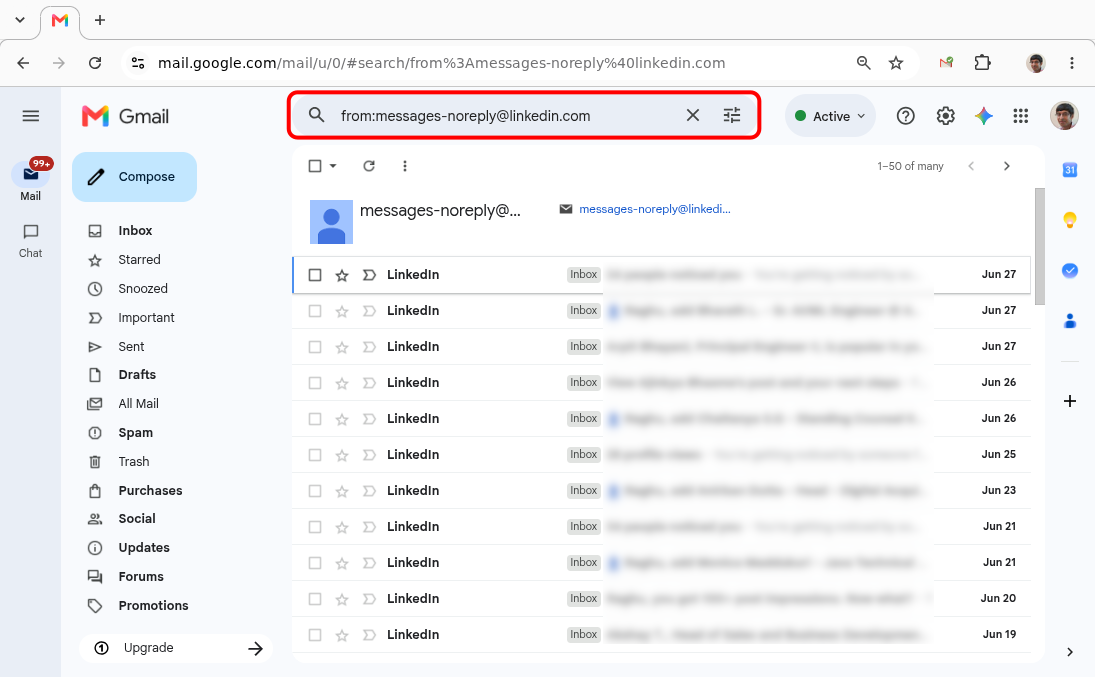
Step 2: Select all visible emails
At the top-left of your results, check the checkbox. This selects all emails currently visible on screen - up to 50 at a time.
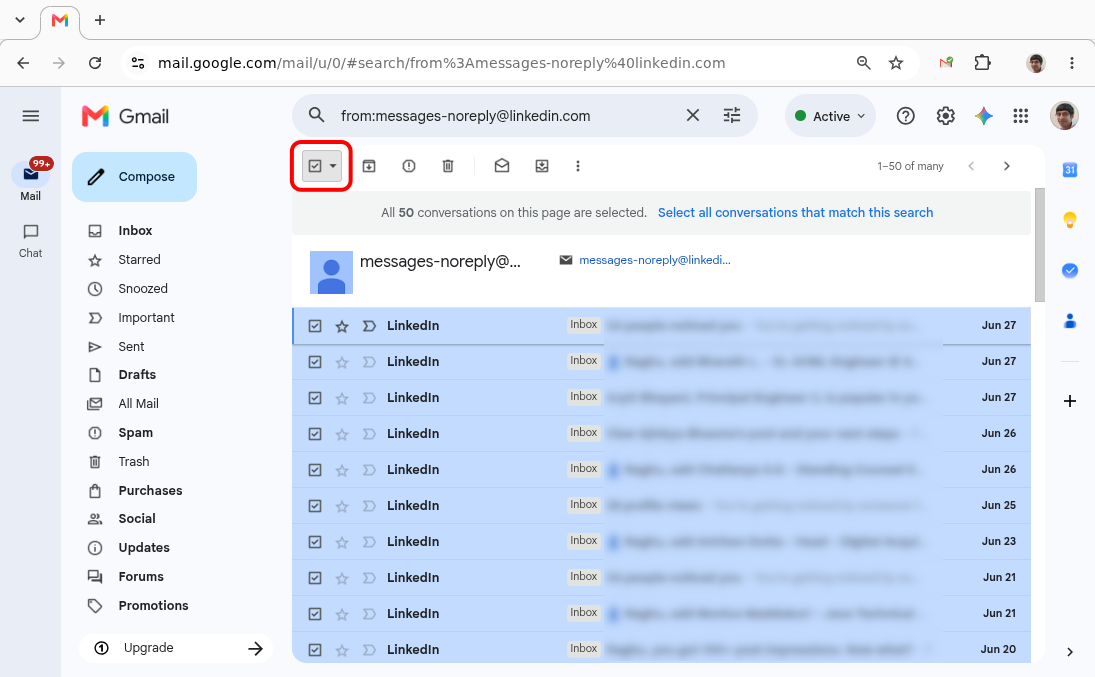
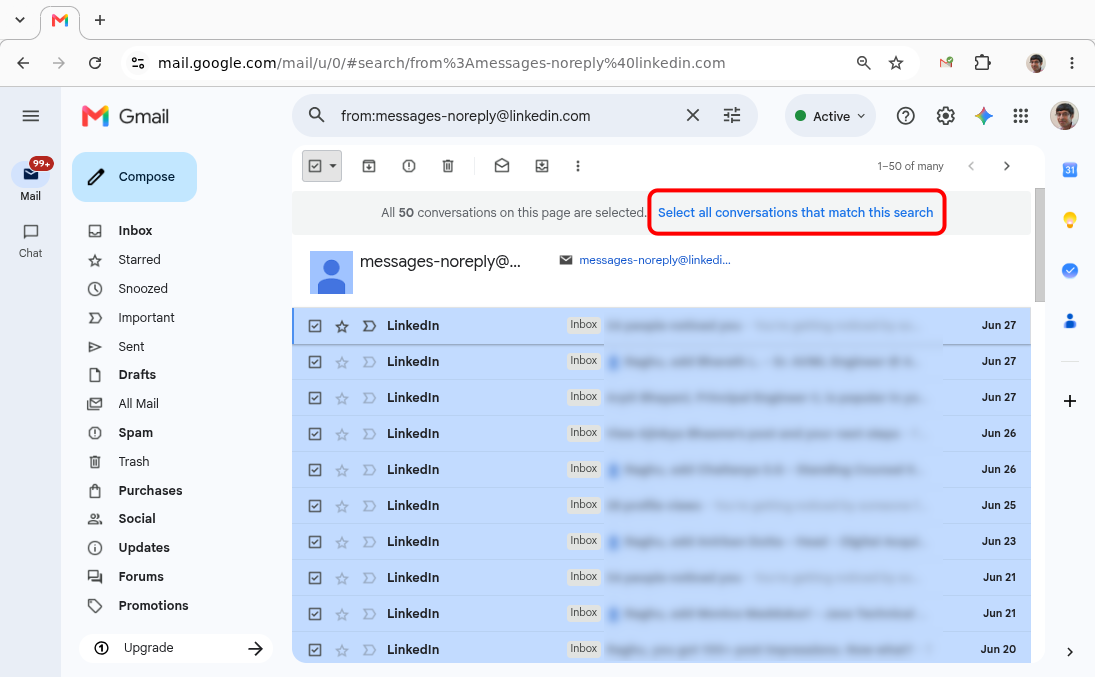
Step 3: Select all matching emails (the step most people miss)
After you check that box, a banner appears just above your email list:
"All 50 conversations on this page are selected. Select all conversations that match this search."
Click that second link - the one that says Select all conversations. This is the critical step. If you skip it, you'll only delete the 50 on-screen, not the hundreds or thousands buried in your archive.
Step 4: Delete, then empty Trash
With everything selected, click the Trash icon. Gmail moves all matching emails to Trash.

One more step: deleted emails stay in Trash for 30 days and still count against your storage during that time. To free up space immediately, go to Trash, select all, and click Delete forever.
Variations Worth Knowing
Search by domain instead of exact address
A very useful tip: some senders use multiple email addresses - a brand might send promotions from deals@brand.com and order confirmations from noreply@brand.com. To catch all of them at once, type: from:@brand.com
This returns every email sent from any address at that domain. Useful when you want to wipe out everything from a company, not just one of their addresses.
Combine with a date filter
If you want to delete old emails from a sender without removing recent ones you might still care about:
from:sender@example.com before:2026/01/01
This limits results to emails sent before January 1, 2026. You can also use after: to flip it, or combine both to target a specific date range.
Where the Native Method Falls Short
For a single sender, the from: search method works fine. But it's a one-at-a-time operation.
If your inbox has accumulated junk from 40 different senders - which is not unusual after a few years - you're looking at repeating this process 40 times. Search, select all, click the expand-selection banner, delete, go to Trash, delete forever. Then start over.
There's also no visibility into the problem. Gmail doesn't tell you which senders have sent you the most emails, or which ones are consuming the most storage. You're working without a map - either guessing at which senders to target, or mechanically repeating the same steps until you run out of patience.
Third-Party Email Cleaning Apps - Convenient, But Worth a Closer Look
There are many apps that solve this problem. They connect to Gmail, show you a ranked list of your top senders, and let you bulk-unsubscribe or delete with a single click.
The convenience is real. But most of these apps work by requesting OAuth access to your Gmail account - which, in practice, means granting a third-party server permission to read your emails. Some request surprisingly broad permissions to make their features work.
That's a tradeoff worth understanding before you hand over access. I cover a lot of details about this tradeoff and the risks involved in my previous post on Beyond the Benefits: The Real Risks of "Sign up with Google".
The short version: convenience and privacy are often pulling in opposite directions here.
A Faster Way That Doesn't Require Giving Up Gmail Access
Clear Mail takes a different approach. Instead of connecting to your Gmail account via OAuth, it works locally on your device - your emails never leave your machine.
What it does: sorts your inbox by sender, so you can immediately see who's sending you the most emails. You don't need to guess. The biggest offenders are right at the top.
From there, you select a sender and delete in bulk. No search operators, no repeated manual steps. If you're doing a full inbox cleanout across dozens of senders, the difference in time is substantial. It's purpose-built for exactly the scenario where Gmail's native tools start to feel tedious.
The Bottom Line
If you need to delete all emails from one specific sender in Gmail, the native method works. But if you're doing a broader cleanout - multiple senders, a genuine inbox reset - the one-at-a-time approach gets old fast. That's where a tool built around the sender-first workflow saves real time.
For a quick walkthrough, check out our Getting Started Guide. And if you're ready to dive in:
Go back to Blog